czwartek, 17 maja 2012

Solidarity of rear lights

           Now it's time to cast a little bit more light on the matter of... lighting, which generally works fine let alone a small exception - the rear lights. I believe, if I am not mistaken, that I have mentioned this in one of the first posts, but if not, surely, it was easy to see it in the video of the reception of the car. The following video was shot after two-month stay in the garage and was the first opportunity for Toyota to take a breath of fresh air. The blame, for turning the high beam on and not turning the switch hard enough to get the sidelights, I put on the stress of appearing before such a large audience :-).


           For a long time now, I meant to get to solving the problem with the rear lights. The problem appears when a right direction indicator is put into position. There must be a kind of short circuit and the right turn signal works, but accompanied by all the other rear lights. Oh, this lights solidarity. The following movie beautifully describes how it works mainly due to the night time. You have to look closely in order to see it because the blinking frequency decreases with the transition from right to left, but blinking on the left side can be seen. Frankly speaking, not only after I unscrew both rear lights panels did I saw with my own eyes that all lights are flashing - not only on the right side as I thought in the very beginning.


           I asked among countless number of people, what could be causing this blinking problem, and all as one man said - grounding. Naturally, other answers were given as well, but "grounding" was the most frequent one without any doubt. The first think I did was cleaning contacts and I used this opportunity to have a better look at the rear lights on the right. Mariusz (you remember him from tires changing operation) told me where I could buy such a nice reinforced rubber gloves as he had and you can see them at work. I also cleaned light bulbs siled with paint after the last body spraying. There was a dramatic situation, though, as I let one fall to the fround, by accident of course, and it burst into pieces ;-(. I had to buy a new one and because I bought the wrong one, I learned there is somthing like filament in a bulb... joke: D. Double filament was needed. Now I have it. Thanks to that I also learnt the English word for it. Ha! I am so lucky and happy that TESCO is open 24h/day, except for of all sort of holidays, of course. So I cleaned the contacts, I saw how the cables go and I washed the lights cover on the inside and outside. I am pretty sure that those more observant of you, while looking at photos from April photo session, noticed that the right panel looks much better than the left one, not only because of the sun shining from the right side:-).

           Basically it is everything I have for you today. No success story from that day, but some cool photos and a few interesting pieces :-). If anyone had any idea how to approach the subject I am willing to get the show on the road!

right rear lights seen from the perspective of someone locked in a trunk
that's how the wires look like on the right panel
o, this is where the wires are plugged in
this is the place of the right side indicator that needs support from other bulbs
and this is where the double filament bulb fits into
no, no that's not the double filament bulb - having it here would be too painful...
old, crusted rubber looking appalling...
right rear lights panel from behind...
... and from the front (dirsty, isn't it? :-))

wtorek, 15 maja 2012

Waclaw's curse or how NOT to renovate an old car

            Reality is starting to outpace the one currently existing on the blog, so it's time to knuckle down and catch up with it, especially, that recently I haven't been spending as much time with Toyota as I should or would like to. Therefore, there's a chance to make up for it.
            After changing the tires I wanted to focus on the next element of the car in order to make another step in the process of renovation. I also felt like tiding it a little, so I came up with an idea of concentrating on something not-very-challenging. Hence, my struggles with the steering column began. I think it's the right moment to confess to my ignorance of the names of particular elements I had to deal with while working with the column. I don't even know whether I named this element correctly at all! From this place I wanted to apologize in advance for all the mistakes I made, and thank for all remarks and pieces of advice on the matter. I hope that photos will help in deciphering this subject :-).
            In the beginning, I wanted to dismantle the steering wheel. Hmm... how can I even do this? At first, I thought that it's going to be a piece of cake – I unscrewed two bolts, which enabled access to the main bolt on the shaft, which I unscrewed and the wheel was ready to be taken off. And there it was where the first problem appeared. As a delicate and gentle man by nature I didn't want to abuse my strength while dismantling the steering wheel. But it just didn’t want to come off! I struggled harder and harder and… nothing. I came back home, read Haynes, checked with Piotrek and I knew what to do. The site I got from Piotrek contained some examples of real-life experiences with high level of wisdom in them. I followed the guidance and I put the bolt on its initial position on the shaft before another attempt to take off the steering wheel. These smart safety precautions would save my nose if the steering wheel suddenly came off after a very strong pull. I made it, without hurting my nose! :-)
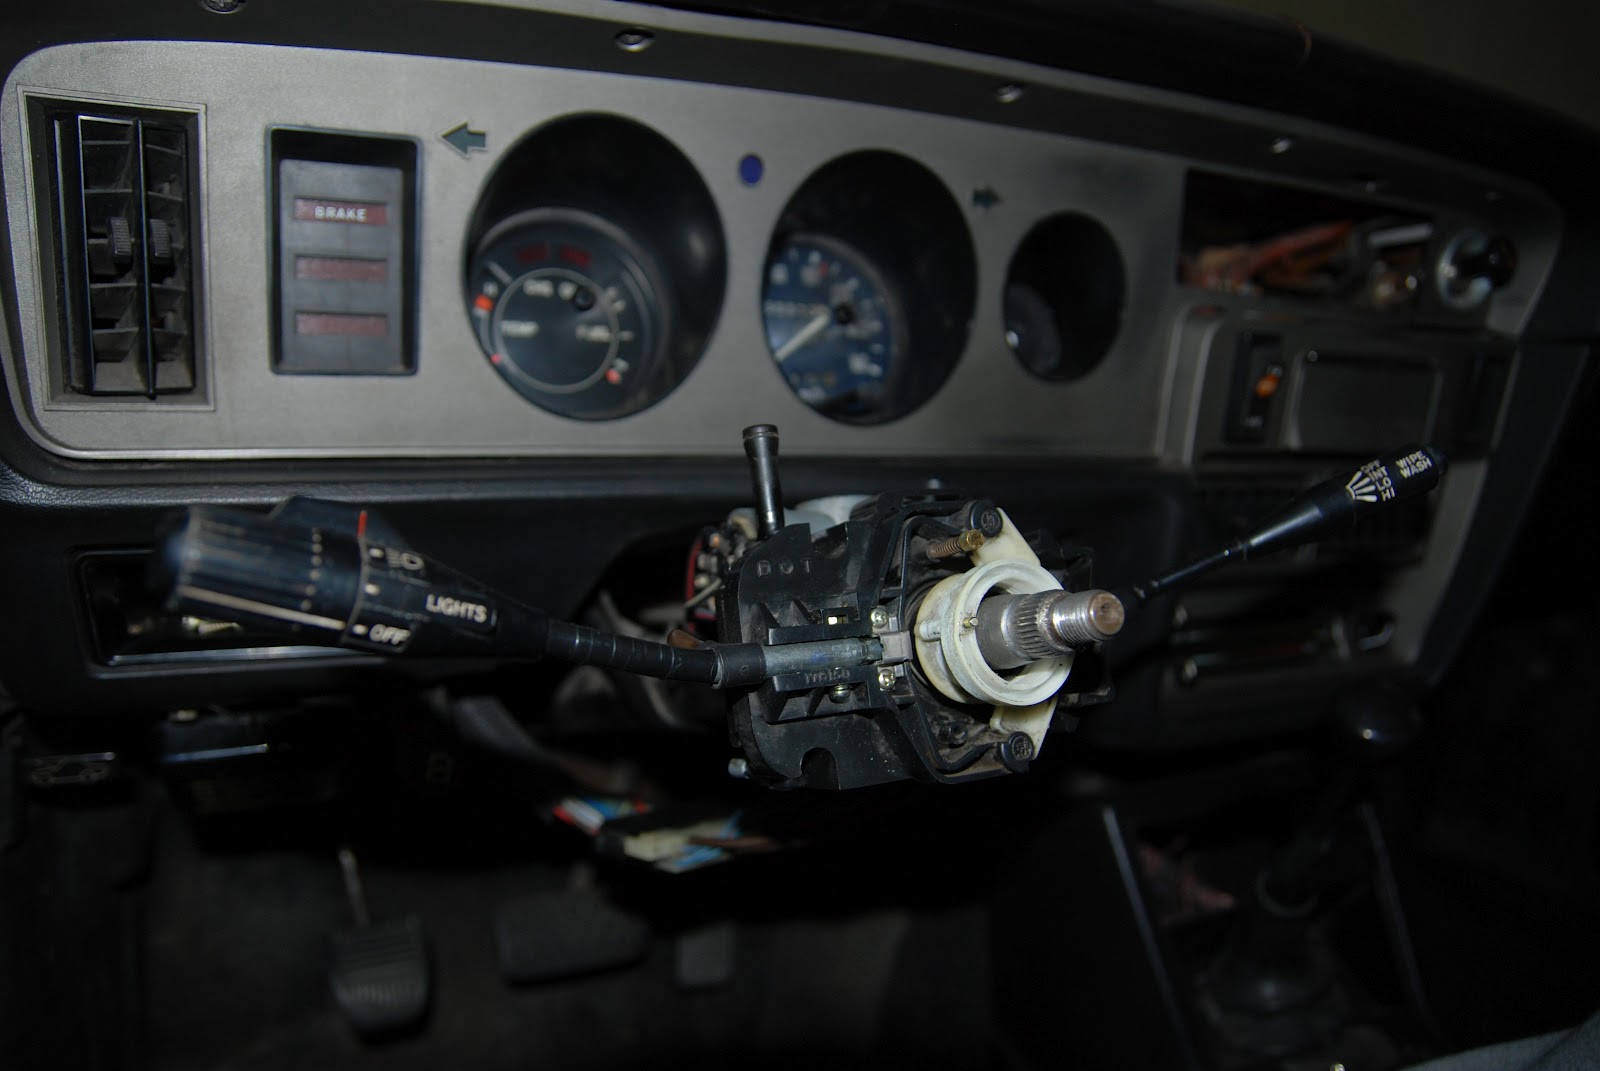
            Afterwards, I unscrewed the bolts from the steering column’s cover and then removed the cover itself, revealing the steering column, which can be seen in the photos below. I was so excited about the whole process that I completely forgot about Waclaw’s interdictions and his Waclaw's interdictions and his curse [1], which I learnt a couple of weeks ago. Truth be told, it crossed my mind to take some photos during the work process, but I just didn't feel like interrupting this interesting task and going all the way back home just to take the camera. Naah…Thus, this manifestation of laziness was to get its revenge soon!
After unscrewing all the screws and unplugging the electrical wiring I removed the steering column and gladly took it home, where, using toothpicks, cosmetic sticks, spirit and other cleaning agents, I started to clean. By the way, I learned how the indicator lever works and how, by turning the steering wheel, turn signal switches off automatically. I also noticed a problem with the mechanism responsible for turning on high beams, and despite strenuous attempts I could not do anything about it. I should have taken some photos…
A couple of days later, time came to pay a visit to my parents’ house, so using the opportunity I took with me the steering columns with everything else. I arrived quite late and barely had time to enter the house and greet with everyone when my dad took the stuff I brought and got down to action. Together we managed to work out the mechanism and everything works like new. I should probably go home more often and bring gradually with me pieces of the car. Maybe after a few months I will manage to relocate it without having to drive it :-).
"All's well that ends well". This time I managed to trick Waclaw's curse, although I know that in the near future it will have plenty of opportunities to remind me about itself. I will have to be vigilant and stick to the bushido code of people renovating old cars. Thanks to this experience, though, I was able to understand the mechanism and the logic behind the important elelemnt of every car. If anyone ever had similar problems or had any questions I would be more than happy to help :-).


[1] This is a set of rules/laws one has to follow in order to complete restoration of an old car without problems. Upon those who don’t stick to the rules a curse has been cast.  Available only in Polish…


steering column after dismantling it to pieces
overview of the steering column
quasi view from the top
attempt to have a closer look
en face view
tore rubber protecting some wires
overview
not working (at that time) indicator
this is how it looks from the other side - the module responsible for sidelights and high beam lights located on the left side

czwartek, 3 maja 2012

A day of good fortune

           Yesterday, as I normally do at least once a week, I was monitoring the Internet. On Allegro.pl (Polish eBay) nothing new - no parts at a good price, no similar models, no offers; on Mobile.de for the last few weeks - nothing new; on Ebay.com generally always the same things, although someone in Australia (I suppose) was selling KE55 parts, claiming that they would certainly fit KE30; on Gumtree.com.au, as always, a lot of ads and cool stuff, but generally in most cases, the sellers were interested to sell locally. Well on the other hand I don’t want to collect everything there is, because I have no space to store it, nor money to buy it:-). I was amused the most by the option on Alibaba.com, where our Chinese brothers for a few dollars can do any spare part for the car. A prerequisite is the order of at least several dozens of pieces :-).
           So, while I was going through various pages I found something I was interested in from the first day of having the car. It was namely… the dash cover, which in my Toyota is in an awful state - destroyed by the sun and cigarettes extinguished on it (?). This is the first element that strikes the eye as viewed from the outside. Anyway, see for yourself how it looks like up close.


And this is how this piece of interior should look like. Time will come to buy it when I will be taking care of the interior of the car.


Dash covers can be found under the following links:
          
Another example of the good fortune that day was finding a person with Toyota Corolla KE30 in Austria! Marion, because that is her name, published information about gasoline usage the car on www.spritmonitor.de and thanks to that I managed to find her. In order to send her a message I needed to be registered and so I did. It was a small price for the opportunity to speak with the owner of such an iconic car :-). I was very pleasantly surprised by the quick and positive response to my message from her. I am very happy because of this acquaintance and the possibilities to exchange mutual experiences and valuable pieces of advice. That is very important. I'm so happy! :-).
           I wonder how many more KE30 lovers are in Europe. I can’t wait to get to know more if them. After all, it is just 98 people with this model of Toyota Corolla I have to find to be able to order spare parts from China:-P.
          

wtorek, 1 maja 2012

April photo session

           Spring, or to be more precise summer, has come to Poland for good. That is why I was so happy to use that opportunity to get out of the garage and take some photos. There was also one, very important reason - the fothcoming application deadline for the Discovery Channel contest I wanted to apply to, but I didn't have any nice photos - all of them in the garage, without sun, a little bit depressive :-).
             For those who don't know about the fan page of Project KE30 on Facebook or prefer to follow us only on the blog I decided to upload the newest photos taken on April 27th.